
I left it last week with me finishing the modelling and baking a high poly model. It was the first time I had attempted baking for Normal and Ambient Occlusion but it turned out quite well and it also meant that I could now help and teach some of my fellow student how to bake normals improving upon their work and feeding that studio based mentality that is crucial in the workplace.


Once I had the bakes I started making some quick color thumbs and making the basic block-out on the albedo texture. Even though I had some idea I still experimented in engine so I could make sure that it would look right inside a game environment. What I found quite interesting about how I made the textures on this project was that instead of making one at a time I made the textures in parallel so I could understand the how the base colors would effect the end result when combined with certain roughness values and if they were metallic or not. This also helped me further understand how to make roughness maps that would effectively create the reflective quality of polished steel.
I made Albedo, Roughness, Normal, Metalness, Ambient Occlusion and Emisive textures. To save on texture space I combined the roughness, metalness and ambient occlusion onto one sheet in the RGB channels.

I made multiple height maps that would be combined with my baked normal in vary levels of detail so that the end result would have the correct surface properties. These included basic shape and dents, going down to scratches and rust before a final feint grain layer. These normal maps would be merged in crazybump to generate the normal map which would be used on the turret.


The three heightmaps
I also made and textured a bullet and bullet casing for the sentry to fire and eject. The process was very similar to the turret but took much less time. Making a baked normal map and ambient occlusion as well as a simple albedo, roughness and metalness. These textures were 512x512 in line with the brief.

The next step was combining everything in the engine and making sure that it would correctly track and fire at the player. Because I had already tested this during modelling it didn't throw any complications in my way and once the sockets were added into the correct place and the meshes switched I had finished the required section. I then had the chance to pursue some stretch goals and decided that I was going to change the particle effect, add some extra effects and add sound to the gun to bring it to life. One of the particle effects I made was a smoke effect coming from an exhaust on the turret where the ejected shells would come from. This texture would be a 512x512 texture that would be plugged into a material with a rotator and sine so it would swirl like smoke would. This was then plugged into a particle emitter which would slowly rise like smoke and added in a socket into the component blue prints of the turret and spin with the gun.


The second effect was to replace the muzzle flash of the gun with my own. I looked at what muzzle flashes actually look like and created a 512x512 texture which was a white yellow burst. I then made the material translucent and see through which when combined with a very faint fast flash would look like a real guns muzzle flash. The main reason I changed the existing one was that it was too stylized for the turret and would fit. I also experimented with adding a laser sight which didn't work at all despite following multiple tutorials. I eventually decided not to add it which is just as well because I'm not sure if it would fit the rest of the turret.


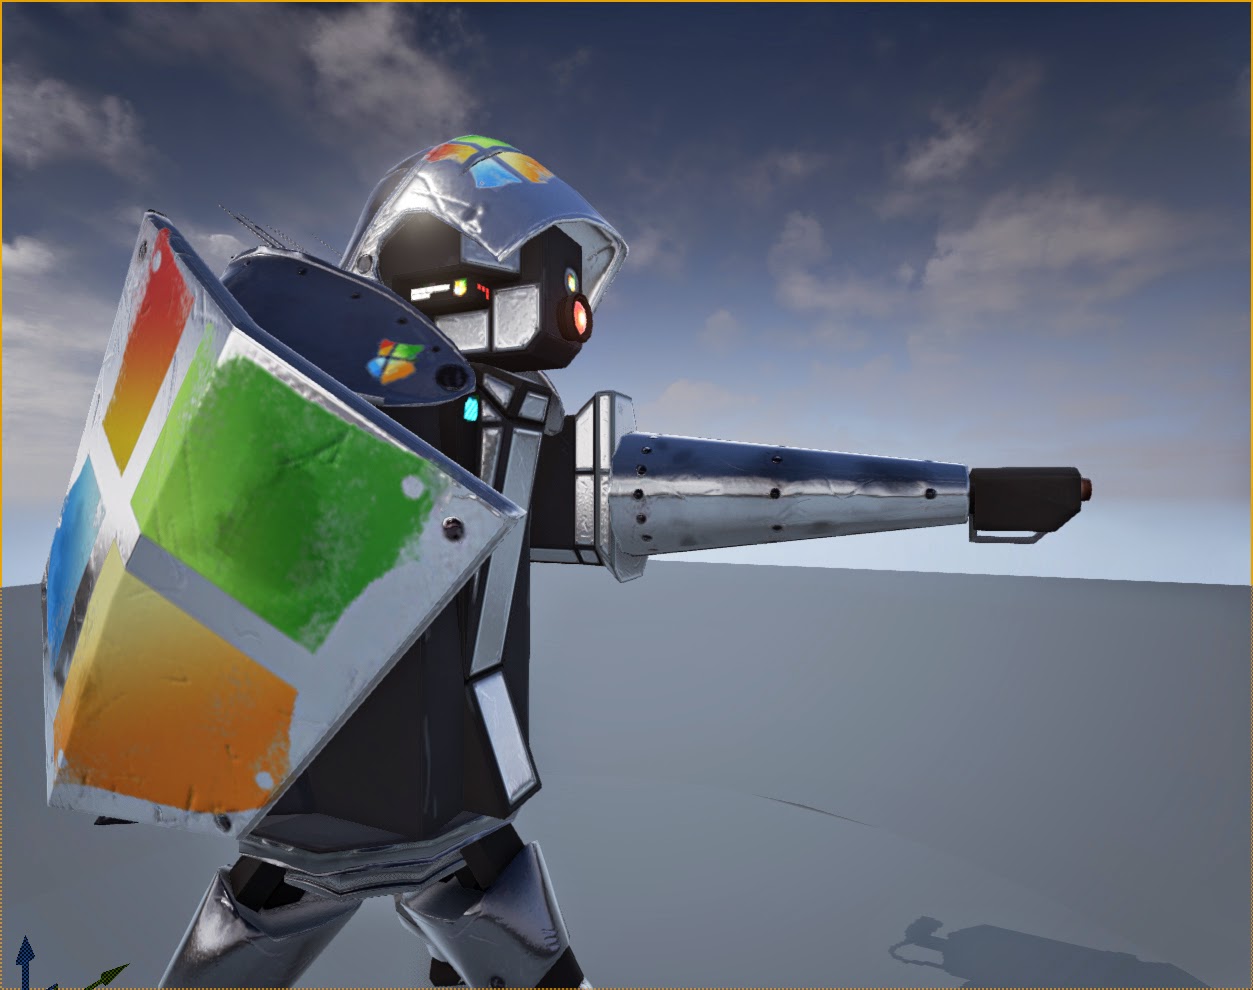
Finished Model
I also made a physical model out of materials I had lying around (old animator newplast) and a promotional poster for the turret.


Overall I would say that I'm not sure that I'm happy with the results because he textures seem too noisy and crowded reducing the readability of the turrets design. This also broke up the silouette too much which was quite dynamic. I also think that th legs didnt fit the turret and looked too slender and effeminate. On hindsight I would have made them industial bulkt struts rather then try to force the idea that its a knight and let it subtly convey that idea.
I would say though that I have learnt an increadible amount from this project in all areas of asset creation trying many different tachniques to improve the turret and this knowledge is much more valuble then the end result. This has uplifted my spirits and pumped me up for the next project which I a character project.
No comments:
Post a Comment